Deprecated: Optional parameter $i declared before required parameter $post_id is implicitly treated as a required parameter in /home/t7m6m0rwkmfd/public_html/wp-content/plugins/acf-repeater/includes/5-7/acf-repeater-field.php on line 739
Deprecated: Optional parameter $i declared before required parameter $post_id is implicitly treated as a required parameter in /home/t7m6m0rwkmfd/public_html/wp-content/plugins/acf-repeater/includes/5-7/acf-repeater-field.php on line 805 Jeremiah Pastor – Page 3 – AcadianX Outdoor Adventures
The “Bullfrog” is one of the founders of AcadianX Outdoor Adventures and its Lead Expedition Guide. Inspired by his love of adventure he continues to explore his world and pass on what he has learned through a lifetime of wilderness ventures. Jeremiah is a former Navy SEAL and a veteran of the deep sea diving industry. He holds a Master’s degree in Mechanical Engineering and has been trained in advanced field medical practices at the Special Operations Medical Training Course in Ft. Bragg, NC. In addition he is an expert in expedition planning and navigation and is responsible for most of the trips taken on by AcadianX.
Jeremiah has successfully guided multi-day backpacking adventures to places such as the Grand Canyon NP, Yellowstone NP, Yosemite NP, The Everglades NP, Death Valley NP, Zion NP, and Glacier NP just to name a few. He possesses world class leadership skills and loves to teach others the joy of exploring their world. His most memorable experiences are when he takes his teenage daughter on his adventures with him because the memories they create together will last a lifetime.
Jeremiah Pastor “The Bullfrog” – AcadianX Lead Adventure Guide
Packed efficiently, a backpack can swallow an amazing array of gear. But what goes where? There’s no one right way to pack. Lay out all your gear at home and try out different loading routines until you’ve found what works best for you. Use a backpacking checklist to ensure you have everything and make notes on your list about what worked well (or poorly) after each trip.
This article offers packing tips and explains the proper way to manage your payload. A well-loaded pack will feel balanced when resting on your hips and won’t shift or sway as you hike with it.
Packing can be broken down into three zones, plus peripheral storage:
Bottom zone: Good for bulky gear and items not needed until camp.
Core zone: Good for your denser, heavier items.
Top zone: Good for bulkier essentials you might need on the trail.
Accessory pockets: Good for essentials you’ll need urgently or often. This includes the brain (top section of the pack), side pockets, and hip pockets.
Tool loops and lash-on points: Good for oversized or overly long items.
Visualize stacking cordwood. You’re laying down rows, not building columns: Fill nooks and crannies until you have a solid, stable load—and be sure weight is equally balanced on each side. Tighten compression straps to streamline your load and prevent it from shifting as you hike.
Sleeping Bag First!
What comes out last, goes in first, because your sleeping bag is the last thing you’ll need at the end of the day. Plus, having a large, light item at the bottom of your pack perfectly sets you up to be able to pack your heaviest gear at the center of your shoulder blades. So, first thing’s first: put your sleeping bag at the bottom of your pack.
Put the Weight Where It Needs To Be
There are a few tricks that keep the aches and pains of hoisting 40-pounds of life necessities up mountains at a minimum—namely properly distributing the weight you’re carrying. Lightweight items go in first—on top of your sleeping bag. This includes clothes, and other odds and ends. Your heaviest items (bear canisters full of food, pots stuffed with food and clothes) and the bulk of the weight of your pack (including water bladders) should be centered between your shoulder blades and close to your back. Then, fill in the rest of your pack with middle-weight gear (first-aid, stove, water filter, etc.) further away from your back and in the middle of the pack—filling in the excess space.
Use Your Brain
The brain—aka the zippered pocket at the top of your pack—is your best friend. Keep everything that you need quick access to during the day here. Sunscreen, snacks, GPS, a headlamp, or an extra layer of clothing belong in your brain. Keeping these necessities where you can have quick access to them will undoubtedly save you from time spent on the side of the trail dissecting your pack, just for a tube of lip balm.
Keep It Together
Invest in some small zippered bags (not plastic bags, because that’s wasteful!) that can help keep smaller items wrangled together. Put your silverware in one bag, toiletries in another, and snacks in another. That way, you won’t be digging through your pack at sunset trying to find a fork when your hunger level is at a strong 10. This is also a great way to cut down on bottles and containers that you won’t need out there. Just squeeze foot powder, sunscreen, toothpaste, into baggies (we can recommend plastic bags for these messier items).
Say No to Backpack Ornaments
Sometimes, not everything fits inside your pack. Tents can be awkwardly shaped and hiking poles can impale your pack—leaving you with gear to attach to your person externally. Luckily, most packs are equipped to handle these scenarios without leaving you looking like a backcountry Christmas tree—with gear dangling all around you (and getting in your way). Attach your tent or sleeping pad to the bottom of your pack horizontally, and use side straps to lock your poles down vertically. Whatever you do, attach external gear in the direction that maintains the integrity of your packs’ shape—because nothing is worse than walking down a trail hitting every tree, shrub, and person that you pass by. Remember, it’s all about staying balanced.
Jeremiah Pastor “The Bullfrog” – AcadianX Lead Adventure Guide
If you’re an adventurer who loves being out in nature, then a hiking or trekking might just be your cup of tea. However, it’s important to understand that while the two activities share a number of similarities, they’re also very different. Understanding the difference between a hike and a trek is crucial for making sure you choose an adventure that’s right for you. So, what is the difference?
Hiking
What is a hike or day hike?
In simple terms, hiking is the leisure activity of walking on well-marked, man-made trails or roads. Hikes range in difficulty levels but typically aren’t too strenuous compared to treks. A hike can last a couple hours, to an entire day, and terrain varies from rolling hills to steep forested inclines. Because of this hikes are often referred to as “day hikes”.
At the end of the day, a hike is an adventure that typically doesn’t leave you carrying heavy gear or involve any overnight responsibilities. This is what the “day pack” was designed for.
What type of traveler is best suited for day hiking?
Hiking is perfect for travelers searching for an adventure that gets their blood pumping without pushing their physical limits too far. You’ll be outdoors, walking for long periods of time and a hike may also involve walking through rain, hail or shine.
So, while the physical demands of a hike are less than a trek, you still need to be prepared to push yourself to some extent.
What’s it like to go on a day hike?
Day hikes are much more involved than a typical sightseeing tour and you’re often able to experience a destination while enjoying a more in-depth experience, as you’re that much closer to nature and the environment you’re visiting. Day hikes involve early mornings, great wildlife photography opportunities while providing the chance to travel with a group of like-minded individuals who love the great outdoors (just like you).
What are the must-do hikes in the world?
When it comes to hiking, everyone has a different bucket list. But there are some hikes that stand out as the most famous in the world:
Tiger’s Nest, Bhutan – Most people who travel to Bhutan opt to make the hike up the side of a cliff to visit the breathtaking Buddhist monastery, The Tigers Nest. Perched 900 meters off the ground, this hike is steep, but the views are definitely worth it.
Distance: 3.25 kilometers (each way)
Time: Two hours to get to the top, however, it is best to allow for five to seven hours for the entire hike
Tongariro Alpine Crossing, New Zealand – Considered one of the best day hikes in New Zealand (and quite possibly the world), this hike boasts phenomenal landscapes and a uniquely beautiful volcanic terrain for your viewing pleasure. If you’re looking for a hike with constantly changing scenery, this could be your top pick.
Distance: Roughly 19.5 kilometers (roundtrip)
Time: Between six and eight hours
Trolltunga, Norway – If you’ve seen a travel photo of someone doing a handstand on a cliff over a picturesque lake, it was probably captured at Trolltunga. Growing in popularity for its beauty and thrill-levels, this hike is both picturesque and extremely memorable for those who are game to brave the adventure.
Distance: 23 kilometers (roundtrip)
Time: Between eight and ten hours
Torres del Paine Lookout, Chile – This hike will leave you wanting to hike again and again, everywhere and anywhere. The highlight of this adventure is hands down the breathtaking mighty towers of Andean granite that demand your attention. Plus, the photo opportunities are nearly endless.
Distance: 19 kilometers (roundtrip)
Time: Between four and six hours, however, this depends on the weather as it can turn in an instant
Faulhornweg Bernese, Switzerland – As one of the most iconic hikes in the world, the Faulhornweg hike takes you right to some of the most iconic peaks in the world. This high-level route is definitely dramatic, showing off stunning meadows, Alpine flowers, and of course, the Faulhorn at 2,680 meters above sea level.
Distance: 15 kilometers (roundtrip)
Time: Between five and six hours.
What do I need to know before I go hiking?
Before hiking, there are a few vital pieces of information that you need to be aware of. It’s important to complete your research about hiking in your chosen destination and is certainly important to test your body and gear so you know what you’re capable of and what to expect.
Test your gear. It’s better to know how things work before you start; otherwise, it might be useless on the trails. Aim to complete a trial run, even if it’s just in your backyard.
Avoid cotton. Quick-drying, breathable fabric will be your best friend out in the elements and won’t leave you uncomfortable if it rains or gets hot out.
Load up on food and water. Most hikers agree one pint of water (roughly half a litre) for every two hours (or four miles) of walking should suffice. For food, you’ll want to pack roughly a half-pound for a full day. Plus snacks. Never forget snacks!
Respect the trail. From other hikers to nature itself, remember that you’re a visitor. Pick up after yourself, be polite (always smile and say wave when passing other hikers), and don’t cause any harm to nature.
Try trail sneakers. Hiking boots are okay, but depending on your hike, they can actually cause you more harm than good. Trail runners are becoming a more popular and comfortable option for many hikers.
Share your plans. If you’re not hiking with an organized tour group or hiking team, it’s a good idea to let people know your plan – especially if you’re hiking alone. Let someone know where you’re starting, where you’re finishing, and roughly what time you’ll return. Better safe than sorry.
What should I pack to go hiking?
If you’re not sure what to pack for your hiking trip, don’t forget to do some research on your hiking location. For instance, a hike through the Swiss Alps will need different gear than a hike through the Amazon.
A comfortable backpack, however, the size will vary depending on the length of your hike
Hiking boots or trail sneakers
Sunscreen and bug spray
Baseball or sun cap
Emergency thermal blankets, because if you get lost, this could literally be a lifesaver.
Food and water. Remember to pack the right amount of water, and healthy food, such as nuts, seeds, trail mix, and energy bars
Toilet paper
Plastic bags
Mini first aid kit
A map
Travel insurance. In some countries, if you do require rescue assistance, it’s going to cost you hundreds, if not thousands of dollars.
Camera
Binoculars
A good attitude
Now that we have looked at the basics of day hiking let’s take a look at Trekking.
Trekking
What is a trek?
A trek is like a hike, but longer, more difficult, and a lot more involved. And by longer, it’s not just a few hours longer. A trek is typically two days or more. In fact, some treks can be weeks in length. Treks are also more strenuous and require more physical and mental ability.
Because you’re walking for days at a time, you’ll need to be fit enough to make it through the entire trip and be mentally strong enough to push yourself. While hiking is a leisure activity, trekking is a challenging activity that pushes you the entire way.
What type of traveler is best suited for trekking?
Trekking tours are ideal for a traveler who’s trying to push themselves, while still experiencing an adventure. This type of traveler enjoys the journey just as much as the final destination. They stay focused and committed, keeping the final goal in mind regardless of the current situation. And while a trekker might get tired, they simply wake up the next morning ready to do it all over again.
What’s it like to go on a trekking tour?
Before one embarks on a trekking tour, they should consider what it’s like to go on one. Unlike a hiking tour, treks are long and challenging. You’ll be walking for hours, for days at a time, through difficult terrain. You’ll likely be camping, and in many cases, you’ll need to be prepared to set up and take down your camp each morning and night.
Depending on your trek, you’ll need to prepare for varying weather. Some of the most famous treks in the world start in warm climates and make their way through rain, wind, snow, and dirt. With a trek, the possibilities are endless – so be prepared to really rough it, including going to the washroom outdoors and bathing in rivers. Treks are in no way glamorous, but they’re arguably some of the most rewarding experiences in the world.
What are the must-do treks in the world?
There are dozens of treks you’ve probably heard of, but never imagined going on. Here are our tops picks for some of the must-do treks around the globe:
The Inca Trail, Peru – This ancient trail has quickly become one of the most famous treks in the entire world. Laid by hand by the Incas, this trail leads from the Sacred Valley all the way to Machu Picchu, over 2,000 meters above sea level. The view from the top is definitely iconic but prepare yourself for long days and the risk of altitude sickness.
Distance: 43 kilometers
Time: Three to four days (different touring options are available, but the most common trek is four days)
Mount Kilimanjaro, Tanzania – At 5,895 meters high, Kilimanjaro is Africa’s highest mountain and one of the world’s most renowned treks. This trek passes through nearly every ecosystem, from snowfields to deserts, and tropical jungles. It is important to note that this trek is quite difficult, and less than half of those who start the trek do not make it to the summit.
Distanced: 51 – 72 kilometers (depending on which route you take)
Time: Five to eight days
The John Muir Trail, California, USA – Considered one of the most famous trails in America, the John Muir Trail lies nearly entirely in the wilderness. This trail covers a lot of ground, passing through Kings Canyon National Park and Sequoia National Park – arguably some of the most beautiful landscapes in America. Brace yourself, however, this is a long trek and you require a permit to hike this trail, so be prepared.
Distance: 340 kilometers
Time: Three weeks if you complete the entire trek
W Circuit – Torres del Paine, Chile – Located in Chile’s Patagonia region and tucked between the Andes Mountain Range and the Patagonia steppes, this trek is perfect for anyone who really wants to experience natural wonders. Known for its glaciers and golden lowlands, this trek showcases nature at its finest, including the always adorable guanacos.
Distance: 100 kilometers
Time: Four to six days depending on the route
Everest Base Camp, Nepal – The epitome of success for any mountaineer, Mount Everest is one trek on every adventure seekers bucket list. However, you can explore the Himalayas without going all the way to the top of the world’s highest peak with the Everest Base Camp Trek. Taking you to the top of the world and regarded as one of the best treks in the world, this one should definitely be on your bucket list.
Distance: 62 kilometers each way
Time: 13 days
What do I need to know before I go trekking?
Before trekking, it’s important to do your homework. Unfortunately, it’s not something you just wake up and decide to do. It takes some planning, preparation, and research. Consider the following before your next trek:
Prepare your body. Treks are long and arduous; your body needs to be prepared. Hit the gym, go for plenty of short hikes, and eat healthy foods to prepare for your trip. You’ll thank yourself later on.
Do lots of research, especially if this is your first trekking tour. You need to know about the weather, language, food… with so much to consider, leave yourself with lots of time to figure it all out.
Plan for AMS (Acute Mountain Sickness). Lots of treks hit some pretty high altitudes and your body won’t be prepared. It’s important to give your body at least two days for acclimatization, so make bookings with that in mind. On top of that, Diamox tablets should be on your packing list in case sickness does strike.
Get travel insurance. Treks are much riskier than a hike. If anything goes against your plan, you might find yourself in a tricky situation. Avoid the risk and make sure you’re covered – especially with traveler’s health insurance.
Know your tent. The last thing you want is a faulty tent or lack of knowledge on your gear. You’ll be setting it up every night, so know it inside and out… literally.
Review the hiking tips. For the most part, what to know before hiking also applies before trekking. From sharing your plans to avoiding cotton, the tips for hiking should also be reviewed before a trek.
What should I pack to go trekking?
As with hiking, the gear for trekking is very dependent on your location and your tour. If you’re travelling with a tour company or guide, they often provide a lot of the camping gear. However, there are some treks that need it all. Do your research and know what to bring. Here’s a place to start:
Nearly everything on the hiking packing list. Seriously, you’ll want all of those items too.
The proper medication for AMS (talk with your doctor)
Trekking Poles
Sleeping bags – invest in a good one, it’s hard to sleep when you’re freezing!
Sleeping mat
Toiletries including shampoo, soap, toothpaste – remember, you’re out there for days
A great tent
Quick-dry towel
Stove and fuel
Bowls and utensils
Water purification
Compass
Lots of extra socks
River shoes or flip flops because after a long day of waking, you’ll want to put on different shoes to give your feet a break
Lighter and matches
Earplugs
Regardless of which adventure you decide to embark on, hiking and trekking are both amazing and unique ways to experience a country, its culture, and its landscapes. You’ll see amazing wonders, experience new things, and challenge yourself like never before. If it’s your first time hiking or trekking, you might just find yourself with a new and amazingly rewarding hobby.
Phrases and words
Blaze – A colored mark, painted or nailed to a tree, about 4 inches tall by 2 inches wide.
Cache – A place where you store gear, food and other supplies before a long trip.
Cairn – A mound of rough stones built as a memorial or landmark, typically on a hilltop or skyline. Mostly used as a mark to guide travelers in the right direction.
Col – The lowest point on the ridge between two peaks.
FKT – The “Fastest Known Time” is the record for completing a section of trail in the shortest possible time.
Hut – A permanent backcountry shelter with four walls and roof that can sleep any number of backpackers, depending on the size.
NPS – The National Park Service in the United States.
SAR – Search and Rescue service.
Scree – A field of loose rocks smaller than the size of your head. It can be very tricky
Jeremiah Pastor “The Bullfrog” – AcadianX Lead Adventure Guide
A hiker can quickly become lost in dense or maze-like backcountry settings, making outdoor navigation skills vital for any wilderness trip. Modern GPS navigation systems are excellent tools for finding your way, but, as with any device, they can fail. Learn multiple techniques for wilderness navigation, so you can get yourself back on track in even the most confusing backcountry locations. When was the last time you planned a trip without a computer or GPS unit? Think hard. Unless you’re a dedicated old-schooler or a Boy Scout, it probably wasn’t recently.
Learning how to navigate with a paper map is an essential skill. If your map skills are rusty, it’s time to brush up. Maps and compasses are the best backups to your navigation system (no battery), and will give you an understanding of the ground you’re hiking over that you just can’t get following a gadget. More importantly: Doing it the way hikers did it 50 years ago is just cool. Let’s brush up on your map abilities with our expert help.
What is a topographic map?
A topographic map is designed to show the physical features and terrain of an area, which is what makes them ideal for backpackers. They’re different from other maps because they show the three-dimensional landscape: its contours, elevations, topographic features, bodies of water, and vegetation.
Why do I need a topo map?
Simplified trail maps—like the JPEG images you might find on a national park’s website— don’t include all the information you need in order to navigate. No elevation data, no magnetic declination, and much fewer symbols. If you get lost, these trail maps won’t help you find your way out. A topographic map offers a wealth of orienteering information—not just elevation and distance, but changes in vegetation and even human-made structures. It’s enough to plan an entire trip in advance or to find your way in a pinch.
Parts of a Map
There are three basic components of a topo map that you need to learn to recognize: contour lines, scale, and legend.
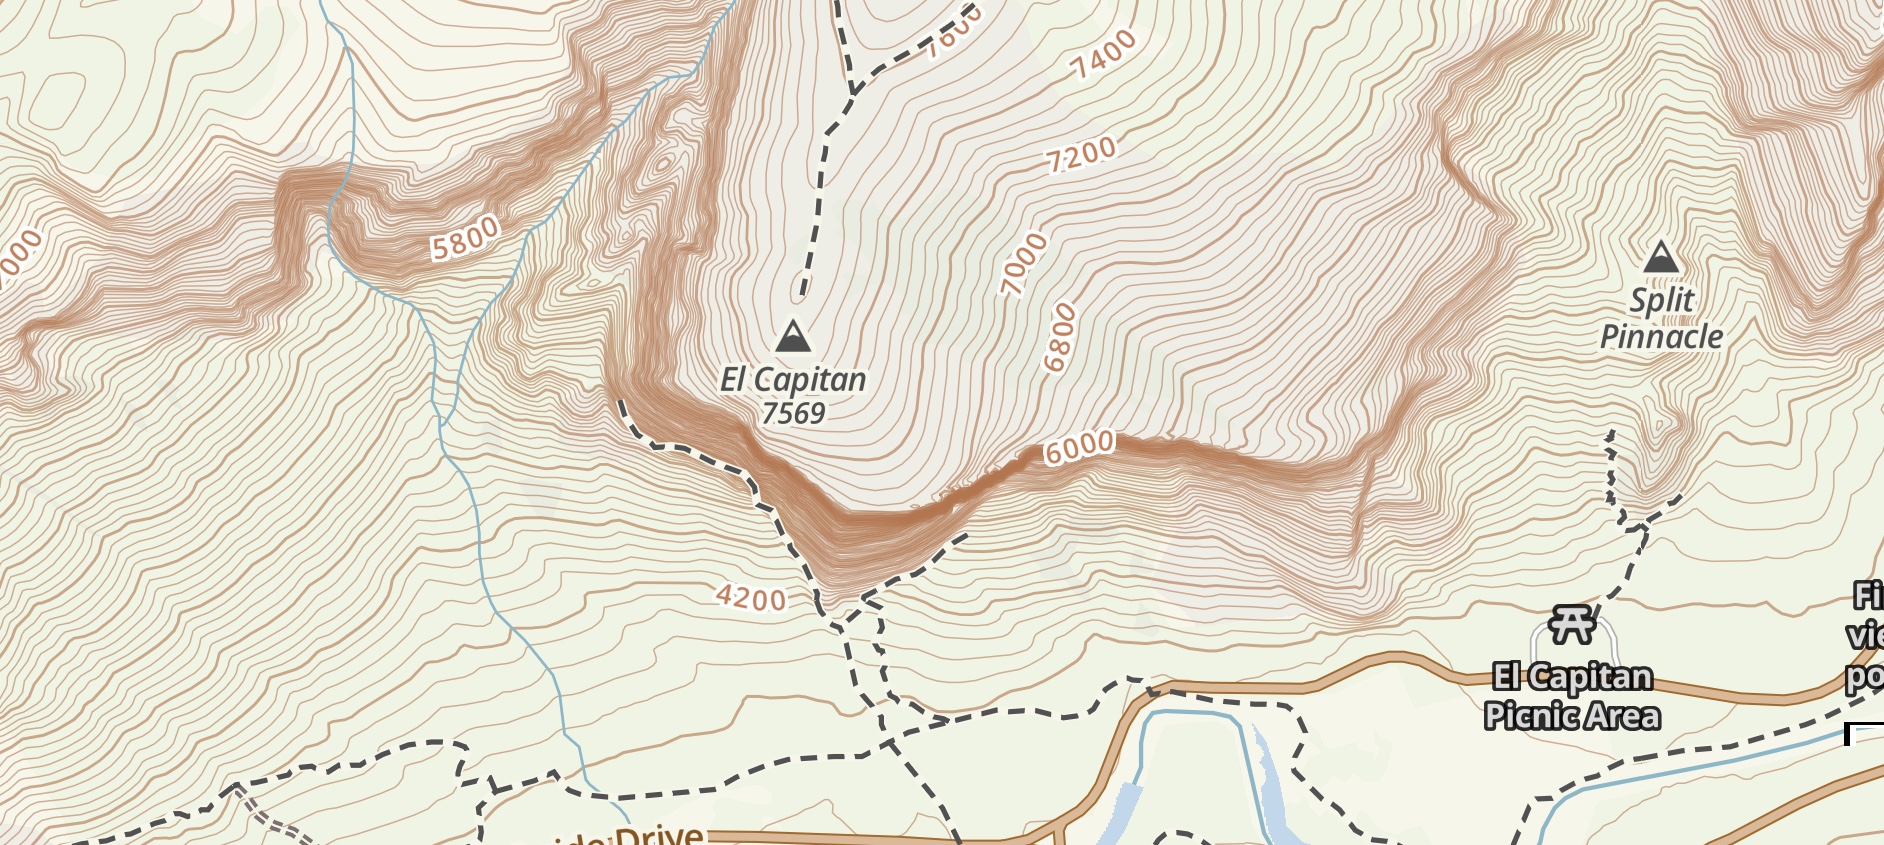
When the contour lines are scrunched up together—like in this map of Yosemite—you’re looking at a cliff.
Topographic map of El Capitan in Yosemite Valley
Contour Lines
Put simply, contour lines show elevation. They’re the bread and butter of understanding a topo map, showing the layout of the terrain and its major features. By showing you the lay of the land and changes in elevation, they’ll give you an idea of what you’ll be walking through and how challenging it will be.
A contour line connects continuous points on the map that share the same elevation. When contour lines are close together, it means that elevation is changing a lot in a short distance. You’re looking at a steep slope or cliff. When they’re far apart, the slope is more gradual.
You’ll notice that every fifth line is thicker than the others. Those thick contour lines are called index lines. At some point along an index line, you can find its elevation written.
The difference in elevation between each contour line is always the same, and that distance is called the contour interval. This number can be found in the map’s legend. Using index lines (with their elevations written on them) and the contour interval (the distance between each line), you can identify the elevation of any contour line on the map.
Contour lines help you visualize the shape of the terrain and its features. Once you understand contour lines, you can point out mountains, valleys, plateaus and depressions. Concentric circles, for example, indicate a mountain peak or a depression. Tightly grouped contour lines might indicate a cliff. Look at the numbers on index lines to see if elevation is increasing or decreasing.
Practice reading contour lines. Sit down with a topo map of a familiar area and see if you can pick out terrain features by looking at the contour lines. Can you identify certain peaks, valleys, ridgelines or saddles? You can also peek at Google Earth to get an overall sense of an area’s terrain before diving into the contours on the topo.
Scale
Scale is the relative distance of the map to real life. The scale can be found in the map legend and usually shows the ratio of map inches to real ground inches. For example, a scale of 1:24,000 means that 1 inch on the map is the equivalent of 24,000 inches—or .38 mile—in reality. (This is the scale used by most USGS topo maps.) The first number, map inches, is always 1.
Scale tells you how detailed the map is. A topo map with a scale of 1:12,000 shows a smaller area and is more detailed than a map with a 1:24,000 scale. It’s important to know how detailed your map is when you’re planning a route.
Maps also include a representative scale, which helps visualize distances in miles or kilometers — much more useful than measuring your hike in inches. Use a piece of string or a ruled compass edge to measure your route on the map with the representative scale.
Legend
The legend basically tells you how to read the map. It contains some key pieces of information:
Source data – Where and when the map was made. Check that the map isn’t out of date, and try to get the most recent version possible.
Scale – Relative distance on the map.
Contour interval – Change in elevation between each contour line.
Magnetic declination – The difference between magnetic north and true north in the given area. This varies from place to place, and it’s necessary to set up your compass before you start hiking.
A color key – Different colors across the map often show the nature of the vegetation. Generally, darker colors mean denser vegetation, while lighter areas mean thin vegetation or even open terrain. Bodies of water are usually blue.
A symbol key – Most topo maps use symbols to indicate certain features. The key may also explain what different stylized lines mean — like boundaries, rivers and streams, pipelines, roads, or railroads. Topo maps may include symbols for:
Buildings
Different types of vegetation
Water tanks
Waterfalls or rapids
Open pits, mine shafts, or caves
Marshes, bogs, and swamps
Glaciers or permanent snowfields
Lakes or ponds
Marine shorelines
High-clearance roads and gates
Railroads
Preparing for a Trip with a Topo Map
A topographic map is a vital tool for planning any outdoors trip. It will help you plan a route, know what’s ahead of you, and be prepared.
Trails usually appear as thin black lines, while roads are thicker black or red lines. (The key should help you distinguish between them.) As you plan your route, keep an eye on the contour lines. You don’t want to plan a route that takes you over a cliff you can’t climb or across a ridgeline you didn’t prepare for. Generally, you’ll also want to have an idea of how steep the hike will be. Find ways around any landmarks you don’t want to traverse and identify the best routes to ascend any peaks.
Once you’ve picked out a route, use the scale to measure its distance. Using a string rather than a straight edge will give you a much more accurate distance estimate, as it will include the twists and turns in the trail. You don’t want to measure a series of switchbacks as one straight line.
Use the map’s symbols to identify water sources, dangerous areas to avoid (like mine shafts), and changes in vegetation. This information will help you pick out the best campsites and minimize safety risks.
The more you practice reading the topo map, the less likely you are to get lost. Keep your map within reach as you hike and follow your trajectory. Make note of landmarks that you pass and take stock of where you are regularly.
Use smartphones and GPS as a tool to learn rather than as a crutch. As you get used to orienteering with a topo and compass, check your calculations against Google Maps on your smartphone. Does your supposed location on the topo match the blue dot on your phone? As you practice orienteering, your calculations should get more accurate. You should never rely solely on GPS technologies to navigate without a backup plan.
Where to Get a Topo Map
You can find topographic maps from many different sources. The one you choose depends on the place you’re hiking and whether you want to emphasize specific information.
Many national parks, national forests, state parks, and other public lands produce detailed maps of their lands. Check their website or local offices to see if they have topographic maps available.
Specialty companies
These companies often produce maps for more popular areas. Sometimes they highlight hiker-specific features, like backcountry campsites, park boundary lines, or certain trails and elevations. (National Geographic’s maps are a great place to start.)
Independent websites
There are a number of websites offering mapping services with customizable, downloadable topo maps that are hiker friendly. Like any other internet resource, just be careful with these. Some of these include:
Jeremiah “The Bullfrog” Pastor – Lead Adventure Guide for AcadianXI would like to talk to you all about something that really disturbs me, trash. I will admit that I am one of those people that gets irritated when I see someone leave the shopping cart out in the parking lot without returning it to the collection corral, but this is a step two far. In a recent trip to Arkansas we were hiking about 8 miles into the backcountry before we reached our desired campsite. Upon our arrival, the first thing I noticed was an excess of trash in the fire ring that contained items such as empty beer cans (first of all, who would even carry the weight of full beer cans into the backcountry?). This is irresponsible and you don’t have to be an outdoors person to know you should pick up after yourself. But many people new to these outdoor spaces might not know that most backcountry areas in state parks are “carry-in, carry-out”, which means they do not have trash receptacles and visitors must take all their trash with them when they leave.
At the end of May, Google searches for hiking and trails hit an all-time high across the country. Visitation to state parks is up in the United States over the first five months of the year compared to the same period last year — before peak summer travel season, and with capacity limits in place since May 1. Sales of outdoor gear including bikes, kayaks and tents are a bright spot in the economy, with some shops not being able to keep gear in stock to meet the demand.
It’s not hard to guess why the outdoors is suddenly so hot, figuratively speaking. With the coronavirus pandemic continuing to rage around the country and many of the summer’s traditional trappings like festivals canceled, the great outdoors remain open, for the most part. And since it’s generally easier to maintain social distance outside, parks are attracting more visitors than ever — including new ones.
For those new to the outdoors — or as a reminder for those who frequently enjoy these spaces— I want to go over something that we at AcadianX feel strongly about, that will help you to get outside in a way that protects yourself, others and the state’s natural resources. It is the principles of “Leave No Trace”.
Leave No Trace
Developed by the National Outdoor Leadership School, the principles of Leave No Trace are an extension of the National Park Service mission to preserve a vast system of resources “unimpaired for the enjoyment of future generations” that challenge individuals to become active stewards in its preservation. The Program builds awareness, appreciation, and respect for the land, and provides a foundation for applying minimum-impact techniques.
Plan Ahead and Prepare
Know the regulations and restrictions for the area you visit.
Prepare for extreme weather, hazards, and emergencies.
Select terrain and mileage based on what your group can handle.
Schedule your trip to avoid times of high use.
As you look through the campsite list in this planner, please note the party size limit that pertains to each campsite. If your group size exceeds these limits, you will need to camp and cook as smaller groups in separate campsites with separate permits.
Repackage food to minimize waste.
Travel and Camp on Durable Surfaces
To prevent erosion, avoid shortcuts and switchbacks.
Walk single file in the middle of the trail, even when wet or muddy.
Camp in designated campsites.
Protect riparian areas by camping at least 100 feet from lakes and streams.
Keep campsites small. Focus activity in areas where vegetation is absent. Avoid leveling the tent site.
Dispose of Waste Properly
Pack it in, pack it out. Inspect your campsite and rest areas for trash or spilled foods. Never bury it or dump it in pit toilets. Pack out all trash, leftover food, and litter.
To wash yourself or your dishes, carry water 100 feet away from streams or lakes and use small amounts of biodegradable soap. Scatter strained dishwater.
Deposit solid human waste in catholes dug 6 to 8 inches deep at least 100 feet from water, camp, and trails. Cover and disguise the cathole when finished.
Pack out toilet paper and hygiene products.
Respect Wildlife
Do not approach wildlife. All wild animals are potentially dangerous. Observe Wildlife from a distance. If your presence causes an animal to move away, you are too close.
Never feed or harass animals. Feeding wildlife damages their health, alters natural behaviors, and exposes them to predators and other dangers.
Protect wildlife and your food by storing rations and trash securely.
Avoid wildlife during sensitive times: mating, nesting, raising young, or winter.
Minimize Campfire Impacts
Campfires can cause lasting impacts to the backcountry. Use a lightweight stove for cooking and enjoy a candle lantern for light.
Where fires are permitted, use established fire rings, fire pans, or mound fires. Campfires are only permitted in specified campsites in designated fire rings.
Keep fires small. Burn only small diameter dead and down wood. Do not break, cut or saw branches from any standing tree (dead or alive).
Burn all wood and coals to ash, put out campfires completely. Fires must be completely extinguished before you leave the site.
Leave What You Find
Avoid introducing or transporting non-native species.
Do not build structures, furniture, or dig trenches.
Federal law prohibits: collecting antlers; removing any plant, animal, or mineral substance; and disturbing or removing archeological or historical items. Leave natural objects as you find them.
Be Considerate of Other Visitors
Respect other visitors and protect the quality of their experience.
Be courteous. Yield to other users on the trail.
Step to the downhill side of the trail when encountering pack stock.
Take breaks and camp away from trails and other visitors.
You can find out more about leave no trace at: www.lnt.org
Hello all and welcome to our newly created blogging page! We hope to start filling our content soon as we get organized. But for now be patient. We will get there.