Deprecated: Optional parameter $i declared before required parameter $post_id is implicitly treated as a required parameter in /home/t7m6m0rwkmfd/public_html/wp-content/plugins/acf-repeater/includes/5-7/acf-repeater-field.php on line 739
Deprecated: Optional parameter $i declared before required parameter $post_id is implicitly treated as a required parameter in /home/t7m6m0rwkmfd/public_html/wp-content/plugins/acf-repeater/includes/5-7/acf-repeater-field.php on line 805 Map skills – AcadianX Outdoor Adventures
Jeremiah Pastor “The Bullfrog” – AcadianX Lead Adventure Guide
This is our level 2 event for our “Beginner to Advanced Backpacking Series”. This is a learning event that features an introduction to backpacking and hiking and a day hike through a local wilderness area where we put into action some of the basic skills that we will cover. Your guide will cover:
Planning Logistics
Route Planning
The “10 Essentials of Hiking”
Basic Backcountry Navigation
Wilderness Travel
We will spend about an hour going over the three topics followed by a hike through the wilderness where we will reinforce the basics that were covered. We will hike in 3 mile segments while taking breaks between each segment. A map of the route we will take is provided. You will need to bring:
Jeremiah Pastor “The Bullfrog” – AcadianX Lead Adventure Guide
This is our level 1 event for our “Beginner to Advanced Backpacking Series”. This is a learning event that features an introduction to backpacking and hiking and an afternoon hike through a local park where we put into action some of the basic skills that we will cover. Your instructor will cover:
The “10 Essentials of Hiking”
Basic Backcountry Navigation
Wilderness Travel – Basic Routefinding Skills
We will spend about an hour going over the three topics followed by a 3-mile hike through nature where we will reinforce the basics that were covered. A map of the route we will take is provided. You will need to bring:
Good athletic shoes or hiking boots
Water or sports drink
Snacks
Small pack to keep your hands free
Something to take notes on.
Parking is available near the nature station trailhead and the class will be held on the top floor of the nature station which is 1/4 mile down the trail or across the campground. See map for details.
Jeremiah Pastor “The Bullfrog” – AcadianX Lead Adventure Guide
When you look at a map they are oriented as north is facing the top of the page. The north that is in that direction is known as “true north”, which means that it points directly towards the geographic North Pole. A compass on the other hand, actually points toward “magnetic north” which is slightly in a different direction than true north and that difference can vary depending on your geographic location. This difference is known as magnetic declination and is usually expressed in degrees either east or west of true north. In order to correct this, you just need to make an adjustment to the heading on your compass.
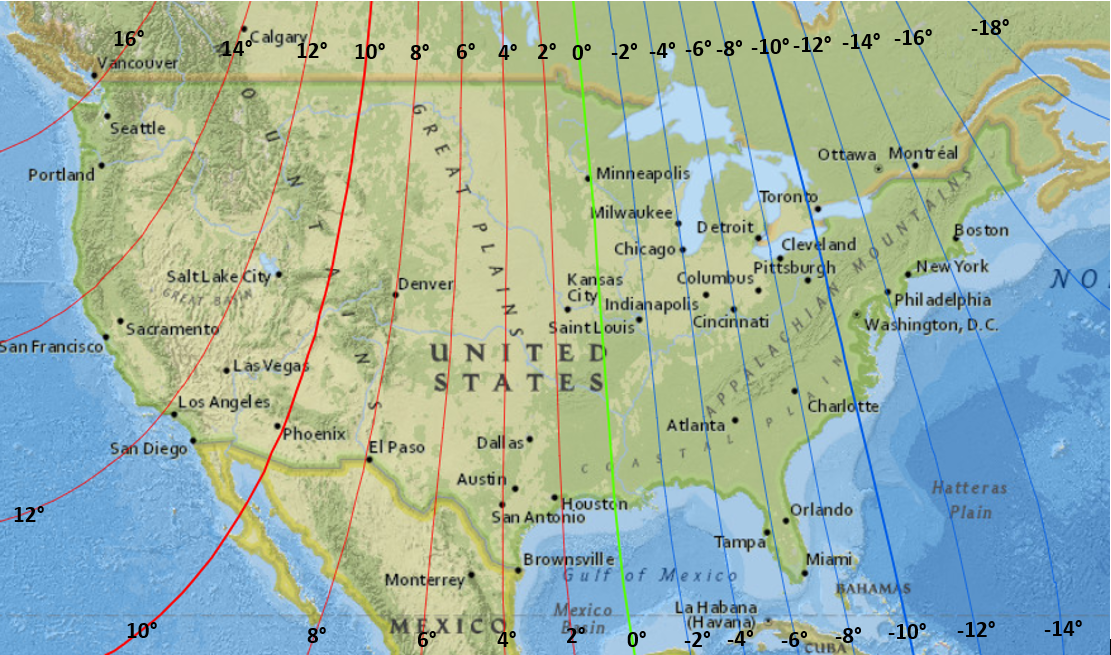
There is a line where magnetic north and true north both point in the same direction. This line is known as the line of zero declination and as of 2020 it currently runs from eastern Minnesota through central Louisiana and is noted in the picture below as the 0° line.
U.S. Magnetic Declination in 2020
If you are located west of the zero line, then true north will be somewhat west of magnetic north and this is known as “east declination”. And the opposite is true if you are east of the zero line, then true north will be somewhat east of magnetic north which is known as “west declination”.
Changes in Magnetic Declination
Magnetic declination varies both from place to place and with the passage of time. As a traveler cruises the east coast of the United States, for example, the declination varies from 16 degrees west in Maine, to 6 in Florida, to 0 degrees in Louisiana, to 4 degrees east (in Texas). The declination at London, UK was one degree west (2014), reducing to zero as of early 2020.
The magnetic declination in a given area may (most likely will) change slowly over time, possibly as little as 2–2.5 degrees every hundred years or so, depending upon how far from the magnetic poles it is. For a location closer to the pole like Ivujivik, the declination may change by 1 degree every three years. This may be insignificant to most travelers but can be important if using magnetic bearings from old charts or metes (directions) in old deeds for locating places with any precision. The map in above picture shows declination for the year 2020 for the contiguous 48 states, and it will be accurate to about half a degree for most locations for a range from 2017 to 2023.
To get the current and 5 year projected magnetic declination for an area the NOAA has a great mapping tool for finding this out. You can find it here:
As stated above, dependent on which side of the zero line of declination you are on will let you know whether you need a west declination or an east declination adjustment. If you are east of the zero line then you will have a west declination, and the opposite is true if you are west side of the zero line because you will now have east declination. Examples of each can be seen in the picture below.
Examples of Magnetic Declination
East Declination – When you are west of the zero line of declination remember that your declination is east. Your true bearing is the measurement in degrees from the line to true north to the line to your objective. However, the compasses magnetic needle is pulled toward magnetic north, not true north. So instead it measures the angle between the line to magnetic north and the line to your objective. Based on the example in the figure below, this magnetic bearing is 15.6 degrees less than the true bearing in Mt. Rainier. To get the true bearing you would just add 15.6 degrees to the magnetic bearing.
East Declination
West Declination – When you are east of the zero line of declination your declination is west. Based on the example in the figure below, this magnetic bearing is 16.3 degrees more than the true bearing in Acadia NP. To get the true bearing you would just subtract 16.3 degrees to the magnetic bearing.
West Declination
Adjustable Declination Arrow
Adjusting for declination can be simple in theory but when put to practical use in the field when it really matters can cause a lot of stress on the mind and can lead to errors in mental arithmetic leading to possible serious consequences. An easier way to handle this is to upgrade your compass to a model that is equipped with an adjustable declination arrow instead of one with a fixed orienting arrow. This feature allows the declination arrow to be set for any declination. This will then allow the bearing at the index line to be set to your true bearing.
Modified Declination Arrow at Home
If your compass has fixed orienteering arrows, you can easily modify it by attaching a thin strip of tape to the bottom of the rotating housing to act as a modified declination arrow. Trim the edge of the tape into a point and place it to where the end is pointing as in the example in the figure below.
Example of Custom Declination Arrow
Taking a Bearing in the Field with Magnetic Declination
In order to take a bearing with magnetic declination in the field you simply follow the same procedure as you would normally, but you would now align the magnetic arrow with adjustable declination arrow, or the taped arrow as opposed to the orienting arrow on your compass.
This information was taken from our training course on Backcountry Navigation. If you would like to know more follow the link below and register for the course. This course will teach you everything you need to know about navigating yourself through the wilderness.